
Cucumber Mask DIY - 3 Easy Ways

I know it looks like I'm about to show you a recipe for salsa, but guess again. Haha. Instead, I've got three ways to make a lovely and refreshing cucumber mask. Perfect way to beat the heat and stay beautiful :)
Herbal DIY Face Toner Recipe ~ 3 ways
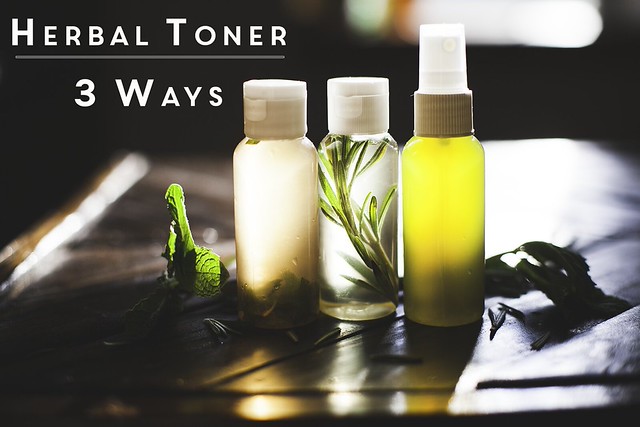
I was always skeptical of toner. I thought- "What does it actually do?" I was convinced it was just another one of those useless things that corporations came up with to sell more products and make more money. But as part of my collaboration with Belmondo, I received some of their toner, and now I'm a total convert. So why do I like it?
#1 It's refreshing- especially when straight out of the refrigerator, and especially in the summer months!
#2 It can bring an extra somethin' somethin' to a dull complexion by minimizing pores and smoothing things out.
#3 If you use the right ingredients for your skin type, it can help with problems like dryness, excess oil, or acne.
After thinking about all this, I was really excited to tinker with a few recipes of my own!
All those herbs made my kitchen smell wonderful!
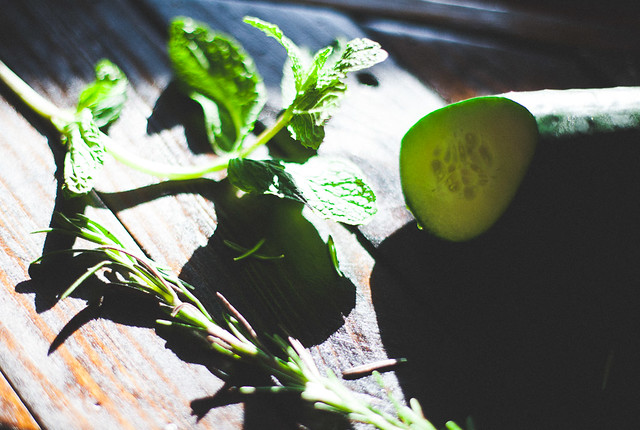
I decided to incorporate mostly herbal bases, because I've been using them for years, and believe in the medicinal healing properties of the ones that I used- chamomile, mint, and rosemary. Taking these herbs internally has always been wonderfully beneficial for me, so I was interested to see how they wold work topically.
Also as always, I love these recipes because you can use things that you might already have at home-
MATERIALS NEEDED
+ Fresh Mint
+ Fresh Rosemary
+ Chamomile
+ Cucumber
+ Grapefruit
+ Witch Hazel- I used Thayer's
+ 6 tea cups for brewing/ mixing
+ 1 teapot
+ 1 strainer
+ Three small bottles or jars (1-3 oz.) like these
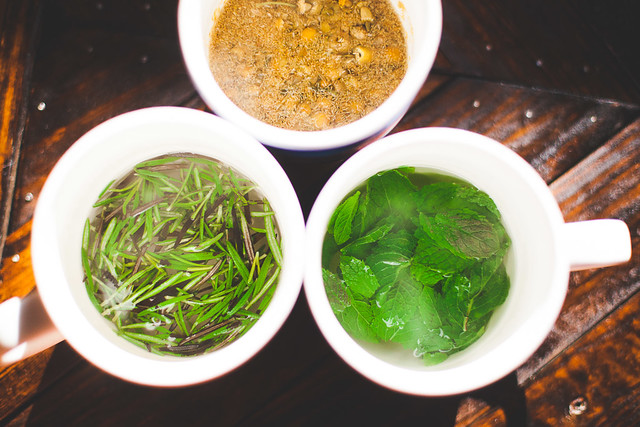
PREP WORK
+ Boil about a half cup of water per toner solution (so if you're making three toners like I did, then you need 1 1/2 cups.) Put two heaping teaspoons of herbs in each cup.
+ When the water boils, divide it evenly over each set of herbs... kind of like you're making tea!
+ You want the solution to be as strong as possible, so let everything steep until cooled.
+ When cool, use a strainer to strain the solution into a new cup.
+ Squeeze the juice from one grapefruit.
+ Juice (or dice into strips) one cucumber.
*Note- you can use tea balls if you don't have a strainer. However, with tea balls there will usually be loose little herb bits floating around. Nothing wrong with that... if you're using a spray bottle, it might clog it up.

Rosemary Witch Hazel Toner
+ Add 1 Tsp of witch hazel to your rosemary solution.
The witch hazel has a strong smell, and some people prefer just the rosemary alone, so you can omit it. However, it is the classic toner ingredient, and a lot of people use it straight on their skin. If you have oily skin, you can add more, and if your skin is dry, add less.
Chamomile Cucumber Toner
+ Add 1 Tbs of cucumber juice to your chamomile solution.
+ If you don't have a juicer, you can always just dice up some strips and stick them in to infuse overnight! I tried this, and found that it made the toner look a bit like pickles. Haha! If this is cool with you, go for it!
This is a soothing toner for sensitive skin- the chamomile is an anti-inflammatory, and the cucumber reduces puffiness.
Peppermint Grapefruit Toner
+ Add 1 Tbs Grapefruit juice to your peppermint solution.
Aside from being two invigorating scents, both of these ingredients are good astringents, and will help with acne problems.
These can be store in refrigerator, for up to a week (I usually do longer ;) Plus, the cold spritz makes all the difference in the world!

:: FOLLOW ::
Belmondo Skincare Review + Giveaway!
Hope everyone's week has been going well so far. Today I have a review for you all.
Have you heard of Belmondo? It is an organic skincare line- many of whose products center around the natural properties of olive oil. I was approached by the company a few weeks ago and was on board to try out their stuff. Looking at all my DIY's it's obvious that I'm super into natural skincare, and am always looking to up my game in that department.
So they sent me their travel kit- which includes a face cleanser, exfoliator, toner, face cream, and body cream.


DIY Bumble & Bumble Surf Spray
So I was browsing around Sephora the other day, like always. And I decided to try Bumble and Bumble’s Surf Spray. And what do you know, I thought it was pretty great. True, the results were not an exact reproduction of the beachy waves I’d rocked each summer growing up on the coast of Rhode Island. But it sure did make me look pretty, and nice, and I decided needed to have it.
But $25??! Ugh.

I liked the product a lot, and was working up the nerve to shell out the money, but then it occurred to me that “Hey- I can totally DIY this!” And so I did.

Best Makeup Products ~ Cheeks and Lips
So here we are.. Part Two of the two-part series detailing my favorite makeup products as of late. (Here's Part One!) Let's go!

CHEEKS
Yeah… I have a mild blush addiction ☺ I have over twenty blush products, which I’ve actually thinned down a LOT over the years (dumping a lot of those drugstore products along the way.) But I have #noshame cause guess what?! Powder never goes bad!! They’ll stay good practically forever.
Lately, I’ve been loving loving LOVING Nars multiples. When I was doing research about them, the general internet consensus is that people don't like them as much as the powder blushes. However, I am here to rep hard for them, and tell you that they look great, they last long, AND they show up well on camera! Multiples 4lyf!!
My decision to look past the negative reviews and take the plunge came when I saw this photo shoot. We had stopped in Sephora, and I tested out the product right before we took these photos. For some reason, it always seems like no matter how much blush I pile on, it never shows up in pictures. Well... this one did and looked GOOD. So even though it’s $40, it was a must-have for me. I (somewhat) got around the steep price tag when I snagged the color Malibu during Nars' Black Friday sale. Loved it so much, that I picked up a mini version of Orgasm on eBay.
I usually dust another blush on top as well. I have many, but current faves are NARS desire, NYX mocha, and Milani Luminous (this one is discontinued.)

LIPS
I could go on and on, waxing poetic about my love for lip products, but I’ll keep this relatively short and sweet.
My favorite, FAVORITE holy grail product right now is Laura Mercier lip pencil in Potpourri. Sometimes, I don’t even wear a lipstick or anything over it. I just put this pencil on with some chapstick and call it a day! Seriously it glides on like butter, and is one of the most flattering shades I have ever come across. And I don’t even like pink lips! It’s just the best.
My other go-to products are MAC Cedar liner, MAC Twig lipstick, MAC Russian Red (a staple for ANY lady), and Lipstick Queen Saint Natural, and Sinner Rose. All mentioned have made numerous appearances here on the blog.
Hope you found all this info useful, if you have been sitting on the fence about any products I mentioned. Either way have a great day (+ thank you for the comments and love on the last post. Will be responding later. xx)


Best Makeup Products ~ Eyes and Skin

I haven’t done a makeup-related post in awhile, and have been gathering quite a few new products in these past few months. My beauty routine is an ever-changing thing, and I'm always switching it up according to my mood, new styles, and new finds. So I thought I’d let everyone know what products are currently making me swoon.
To preface all this, I’ve got to say that I’ve become quite the snob this year, turning my nose up at a great many drugstore products. I find I get more excited over using things that make me feel more “expensive.” ☺ And I now carefully curate just a few things that I really want, rather than binge-buying tons of cheaper items.
SKIN
Until this year, I hadn’t worn foundation since high school. All I could picture was the orange, cakey mess that would usually happen when I tried to apply it then.
And well, to tell you the truth, I'm still really not much of a fan. It's BB cream all the way for me... and the real Korean stuff, not the American versions. They’re lighter, and better for your skin than even a tinted moisturizer. I like Skinfood and Etude House. Just a few dabs even out my skin and don’t make me feel like I’m wearing gobs of makeup ☺ And the packaging is usually so cute!!
As far as moisturizer, I was just using Trader Joes coconut oil for awhile! It was smooth sailing until that jar broke. I picked up another brand, and promptly got three HUGE zits that have been taking me months to get rid of... Such sad. So horror. WOW. ...So recently, I've just been taking it easy, and using Lush's Vanishing Cream.
This is also the year that I've been wearing a lot more sunscreen. Like, constantly. I always found most sunscreens to make my face look shiny and plastic-y, but Neutrogena dry touch has been a godsend for me.
EYES
This seems to be a year of firsts, I guess. Because this is the first year that I’ve paid any real attention to eyeliner… ever. I always associated it with the girls in school who favored the “raccoon” look (accompanied by the cakey orange foundation, of course.)
But recently, I’ve discovered that I do like the look of a heavy eye… I just use dark brown rather than black. Even though black is standard, I still feel like it can look a little harsh on me. My favorite liner right now is Makeup Forever’s aqua liner in matte brown. It stays put, and the color is perfect. I also use Sephora’s waterproof liquid liner on my top lid (matte brown.)
I still don't tend to wear a ton of eyeshadow... Usually it's just a MAC paint, along with a Besame highlighter shadow I've been using for years. I’ve been paying more attention to my brows lately though, filling them in a dark brown matte eyeshadow to help shape them, and keeping them in place with a clear masacara.
I top it all off with Covergirl's lashblast mascara, or a natural looking pair of false eyelashes. And that's it!
Part two (cheeks & lips) will be next week!! xxo

Honey and the Moon

In the past, I haven't been much of a perfume girl. I guess maybe because I'm a singer? When I started taking voice lessons for the first time, my teacher told me perfumes were a no-no. It "dries out" your nasal passages or something. Truthfully, heavy or cheap perfumes sometimes do bother me. I especially tend to hate most floral-y or "clean" smelling stuff, and gravitate toward sweet smells... strange as it may be, Aquolina Pink Sugar was the only perfume I could stand for a long time. (Hey- sometimes you just want to smell like a cupcake!)
A few years ago, I sprayed Honey and the Moon by Tokyo Milk on myself at an Anthropologie. Despite my avoidance of scents, my mind hasn't been haven't been able to let go of it since! I finally ordered a bottle for myself a few months ago, and it was everything I remembered it to be. It's delicious yet mature... I just wish it came in a bigger bottle!
The purchase has opened the door to a world of fragrances, and now I've got about four that I wear regularly. Even though I'm still pretty picky :P
And that is the story of the evolvement of my relationship with perfume. Which I'm sure you were all dying to know :)
Do you have a favorite or signature scent? xxo

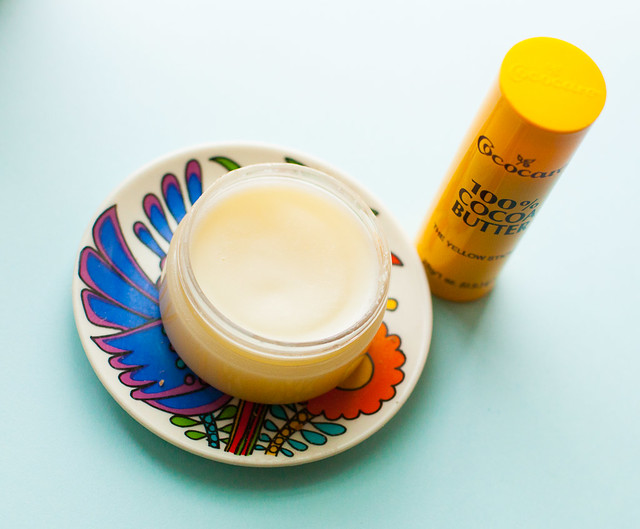
DIY Coconut Oil/ Cocoa Butter Moisturizer
My quest for a perfect body butter continues!!
Here's the deal... I was loving my cocoa butter for a long time. Remember my adventures in homemade body butters? I liked the bars that I made, but I noticed that they were still quite hard to melt. You can use them in the shower, but they would get a little moldy after a time.
Then, I discovered coconut oil. LOVE. Not only can you use it in cooking, it can be used on your hair and skin as well. It dries fast and moisturizes wonderfully... especially after a shower. But I started to notice that it has the opposite problem of cocoa butter... it melts fairly easily. On a semi-hot day, I noticed that my jar had become completely liquid. So I decided to try combining the two! Together, they make an unstoppable moisturizing duo.
Or so I thought...
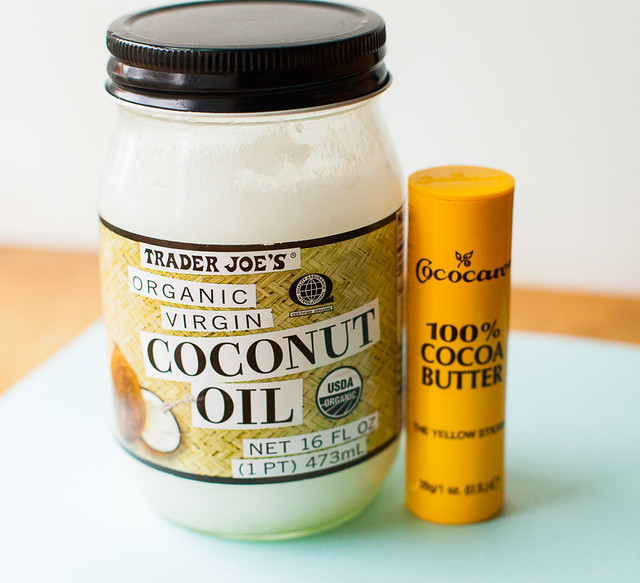
I had a 2oz jar, and I used about 2/3 coconut oil to 1/3 cocoa butter. The mixture is still pretty melty, but I'm in love with this new combination. I think next time, I'll use a bigger cocoa butter ratio.
Even with the drawbacks, this is still my favorite moisturizer yet. The smell is unbelievably delicious!! Imagine coconut and chocolate... it's addicting!

Honey Almond Scrub Recipe
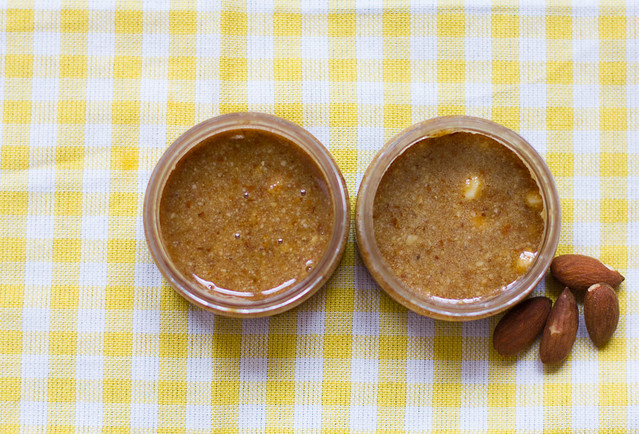
Sooo... what's up?? I've totally been sick for the past couple of days. I was laid up in my bed almost all of yesterday feeling terrible, which is why I haven't really been posting for the last few days :( I did, however, manage to make this honey almond scrub that I've been meaning to do for ages!
You see, I've been looking for a good face scrub for awhile. I used to use Dark Angels by Lush, but I didn't like that it always left little bits of charcoal all over my face. I'm also a huge fan of Angels on Bare Skin... and I read somewhere that a main ingredient was ground almonds. I also used ground almonds in my body butters last spring.
What you need:
8 Tsp of ground almonds (just grind some almonds in a coffee grinder, food processor, etc.)
4 Tsp of honey
1 Tsp of lemon juice
MAGIC.
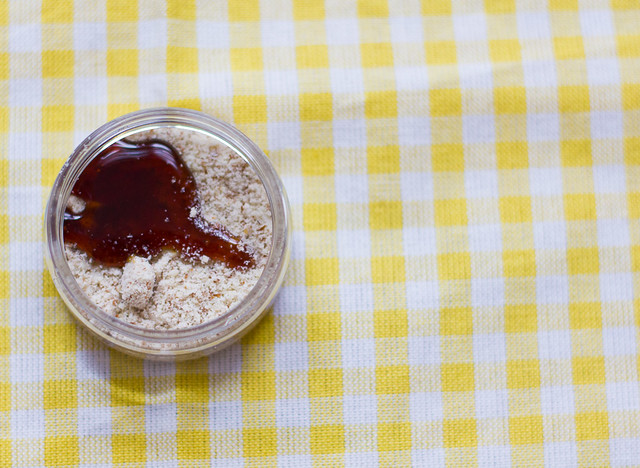
This will make about 2oz of scrub, and I ordered a few 2oz jars from sunburstbottle.com to keep the mixture in.
Now, some more about why I chose these particular ingredients- The almonds are really gentle. They exfoliate your skin while not scratching/ tearing at it. This is really important. They also leave a small trace of almond oil behind, which is very good for skin :) The honey is a wonderful addition, because it is a humectant- it keeps moisture inside your skin. And the lemon has a brightening effect :)
I personally found this recipe to be very moisturizing, while not leaving my skin oily. The scrubbing aspect was perfect- not too harsh, but did its job. Also, this is another skin recipe in which you could probably find the items right in your cupboard already.
The best part about this recipe- if you get bored of it/ don't like it, you can just eat it (It's delicious.)


♥ watch my new video for "just the way you are" on youtube!! ♥
How to choose false eyelashes ~ Part 1
Alright! As promised yesterday, we are about to get into how to choose a pair of false eyelashes for yourself. So may I present PART 1~ Styles and brands of eyelashes. Not sure where to start, so I'll just dive right in...
There are many, many different styles that I have tried and used over the past few months. They range from natural, voluminous, long, dolly, cat eye, whispy, criss-crossed, and soo much more! Each type of lash that I just mentioned has different properties, and will create different look for your eye (and maybe even your whole face.)
For instance, a "natural" lash is usually set on a tan-colored spine, and designed to mimic your natural lashes. Voluminous ones are thick and densely packed... think old-school Hollywood glamour. In my research, I also came across a "dolly" type, associated with Japanese or Korean fashion... these are specifically designed to make your eyes appear larger.
It's really fun to experiment with different styles and see which ones you like best!
I think I can best demonstrate all this by showing you pairs of lashes that I already own, and telling you what I like or don't like about them... so here goes! First up, we've got a very luxurious pair that I adore...

These gorgeous lashes are from a brand called Faux (similar here.) I picked them up at Lulu's style studio last year for free, but didn't actually use them until several months later.
These babies voluminous, the fibers criss-cross at the spine (this makes the lash look more natural) and they taper off at the ends. They also have a black spine and a very rigid curve. Most reviewers I've come across see this trait as a negative, but I actually like the rigidity. I find that it makes the lashes easier to put on. The fibers feel expensive and luxe on my eyes... and I love the fact that they're not actually black, but a dark brown!
Bottom line: I would recommend a lash of this type to anyone seeking extra glamour or drama, without looking overly fake.
You can see me wearing these here and here.

Next up, we've got the elusive "dolly" genre, and these lashes are from a brand called Dolly Wink (similar here.) I came across them while I was researching which brands were the best. They have a cult-like following in Korea and Japan, and are associated with creating the Japanese "gyaru" look. I thought the brand looked cool, and I was intrigued. So I hunted down the product range at a hole-in-the-wall Chinatown store.
When I saw the product line in person... holy moly, they were outrageous! The longest lashes I've ever seen... like daddy longlegs on your eyes! But people online raved about the quality, so I got a pair that was a little more natural-looking. When I tried to wear them out, they still seemed a little out of control for real-life.
Bottom line- try out this brand if you're interested in making your eyes appear larger, are searching for an over-the-top dolly look, or have a fetish for length. This particular style I got also has a slight cat-eye, which I thought looked nice :)
I'm wearing them here.

And here we have the drugstore mainstay, Ardell. I didn't like the first pair of Ardell lashes I bought, which are the "natural" type that I mentioned. Pet peeve about this type- I actually don't love the tan spine, and don't think it looks any more natural than black-spined lashes. If you have thick eyeliner on, it can actually be distracting. Besides that, the pair I had didn't seem to keep their curved shape, or last very long.
However, against my better judgement, I got a second pair from the beauty supply store down the street for $3... (they were $6 at Walgreens.) They are now my go-to pair for everyday. And yes- they do look natural enough for everyday if you place them correctly on your eyelid :)
Bottom line- You can totally use natural-looking lashes for everyday wear- don't fear that they look fake. No one can tell, and they will really kick your everyday look up a notch.
It's hard to see (they don't photograph that boldly), but I'm wearing them in these pictures.


Kiss (similar here and here)- This is a brand that I picked up at the same local beauty supply store, and I love them! They're made of human hair, and they offer several styles, which I have tried with varying degrees of success.
#1 Kiss lash is of the voluminous variety, but straight (as opposed to criss-crossed, as seen in the very first example.) I wanted to love these ones, but I don't... It's very obvious if you put them on crooked :/ See me wearing them here.
Bottom line- this style is lovely for parties, events, and photos. But make sure you trim them exactly to your eye length, as well as take the extra time to put them on straight.
#2 Kiss lashes are the cat-eye volumes! Love, love, love. These were the very first lashes I picked up from this range. They are dramatic and sexy! I wore these on New Year's and on one of my more recent style shoots.
Bottom line- I echo the previous statement... but these ones are so hot, I'd consider wearing them in broad daylight :P
#3 Kiss lashes are separated and spiky. Unfortunately not my fave :( They just weren't dramatic enough for me in photos, and I didn't like the way they looked in person, either. If I were less tired (it's 2am), I could give you a better explanation... I wore them in this shoot.
Bottom line- I suppose these could be grouped as a natural-looking lash. If you're into the defined, lengthening look, go for these.
Final note- I like this brand a lot!! They're only $3, and there's such a wide variety... you can experiment with sooo many different styles. You can also make a pair last, as long as you take care of them.

Last (and certainly least) Ebay lashes. I tried these out because you can order a pack of ten for $3. Seems too good to be true, right? Well, it is. I placed my order, and waited six weeks for some cutely packaged, but ultimately cheap and disappointing lashes. They look okay when applied... but when you lay an ebay lash next to one made of natural or human hair fibers, you can tell just how fake they are. Also, when I took them off for the first time, the spine broke, making a kink in it. This makes future use difficult... negating the cost-effectiveness of buying 30 cent lashes.
I also got some bottom lashes from Ebay, pictured here as well. I'm wearing them in this shoot, although you can't really tell! I like look of bottom lashes, but again- the Ebay ones were a bust. They're cheap, basically strung on fishing line, and are pin straight. No curve at all. Every time I tried to curve them around my eye, the other end would un-stick. It was very frustrating, and they weren't at all flexible.
Bottom line- Don't waste your money on these.
So, from experimenting for so long, my favorites are by far...
THE FAUX LASHES!!. Runner ups goes to Ardell, just because I wear those ones all the time.
Some personal eyelash self-discovery realizations: I could care less about making my eyes appear bigger, and length doesn't interest me at all. Give me volume all day long, and lots of it!!! ...But that may not be the case for you.
You may need to do a bit of experimenting on what you may or may not like, and I hope my post has provided you with some ideas. So if you've got an extra $10-$20 lying around, my advice would be to drive down to your local beauty supply store and go hogwild! Buy styles that you think look interesting, and also maybe some things that you might not have considered. You never know what's going to look great on you!
And that concludes Part 1 of my Comprehensive Guide to False Eyelashes... hope you enjoyed, and stay tuned for Part II next week!
All my love.

♥ watch my new video for "just the way you are" on youtube!! ♥
False Eyelashes- The Comprehensive Guide
Eyelashessss!!!!

I avoided false eyelashes for a long time. In college, I bought a pair from MAC to wear with my Playboy Bunny halloween costume (yeah, I was that girl.) I found them horribly uncomfortable, and couldn't wait to rip them off my eyelids the entire night. I'd only worn them on a handful of other occasions over the years, and I regretted it every time. Always the same- they were uncomfortable, they looked fake, and I didn't know how to put them on right.
Last fall, however, I started trying again. I was determined to step up my game in the style post department, as I'd seen so many lovely fashion bloggers donning the falsies with such grace. I did some googling. I did some youtube-ing. I tried a few more times, and now I'm a total convert. I even use them for daily wear- running around to get my groceries and whatnot.
It turns out you just need a few tricks and some practice before you can really rock them to their fullest potential. And while I don't claim to be an eyelashes guru, I do think I can give some tactical advice!
So I've devised a a three part series about how to choose them and rock them-
Part 1- Styles and brands
Part 2- Types of glue, and finally
Part 3- How to put on the suckers
I was going to make Part 1 a part of this post, but the whole thing started to run very long. So I'm making it it's own post instead- it will go up tomorrow. So get ready!
And believe me, I never thought I'd have this much to say about false eyelashes, but evidently I do.
Hope you all have a lovely day. xx
♥ watch my new video for "just the way you are" on youtube!! ♥
Subscribe to:
Posts (Atom)